I’ve been working on image object detection for my senior thesis at Bowdoin and have been unable to find a tutorial that describes, at a low enough level (i.e. with code samples), how to set up the Tensorflow Object Detection API and train a model with a custom dataset. This aims to be that tutorial: the one I wish I could have found three months ago.
Background#
I don’t know much about advanced Machine Learning concepts, and I know even less about Tensorflow. If you’re like me, you’ve heard of Tensorflow as the best Machine Learning framework available today, and you want to use it for a very specific use case (in my case, object detection). You also don’t want to spend months studying what seem to be Tensorflow-specific vocabulary and concepts.
Similarly, if you’re like me, you have some familiarity with Linux and Python. I’m a programmer more than I am an ML researcher, and you’ll probably grok this article most if you’re in the same boat.
Finally, I assume you have Tensorflow installed—at the very least, I assume you can run the “getting started” block of code on the Tensorflow Tutorial page. If that runs without any errors, you should be good to go. If not, this might not be the tutorial for you, and you should get that working before coming back here.
The Plan#
Since this is a complicated process, there are a few steps I’ll take you through (and therefore, a few sections this article will be broken into):
- Set up the Object Detection API
- Get your datasets (both training and testing) in a format Tensorflow can understand
- Train and test the API with those datasets
Finally, during the training step, we’ll set up TensorBoard, a browser-based training visualization tool, to watch our training job over time. Using this model in a different environment (like a mobile device) is, unfortunately, beyond the scope of this article.
Step One: Set up the Object Detection API#
This section will lead you through four steps:
- Download the Object Detection API’s code and copy the relevant parts into a new subdirectory,
my_project - Install and compile Protocol Buffers
- Install and build the python modules necessary for the API
- Test that the API is ready for use
You’ll need a new directory for all of our future work steps, so start by creating one and changing into it.
1$ mkdir obj_detection
2
3$ cd obj_detection
The Object Detection API is part of a large, official repository that contains lots of different Tensorflow models. We only want one of the models available, but we’ll download the entire Models repository since there are a few other configuration files we’ll want.
1$ git clone https://github.com/tensorflow/models.git
Once that download is over, we’ll copy the files into a new directory.
1$ mkdir my_project
2
3$ cp -r models/research/object_detection my_project
4
5$ cp -r models/research/slim my_project
6
7$ cp models/research/setup.py my_project
The Object Detection API uses Protocol Buffers (Protobufs), a message serialization and transmission framework, for some reason I’m not entirely sure about. We need to download and compile Protobufs, however, to get the API to work.
Downloading and unzipping Protobufs will create a bin directory in your obj_detection directory.
1$ wget -O protobuf.zip https://github.com/google/protobuf/releases/download/v3.0.0/protoc-3.0.0-linux-x86_64.zip
2
3$ unzip protobuf.zip
At this point, you’ll need to compile the protobufs. You need to move into the my_project directory and run the compilation script from there, since there are import steps that make assumptions about the location from which you’re running the script.
1$ cd my_project
2
3$ ../bin/protoc object_detection/protos/*.proto --python_out=.
With Protobufs downloaded and compiled, the Object Detection Python module has to be built. This will create a build directory in your my_project directory.
The following commands should be run from your my_project directory: the place you cd-ed into in the last step.
1$ export PYTHONPATH=$(pwd):$(pwd)/slim/:$(pwd)/lib/python3.4/site-packages/:$PYTHONPATH
2
3$ python3 setup.py install --prefix $(pwd) # Lots of output!
4
5$ python3 setup.py build
These commands will first designate the current directory (and some subdirectories) as locations Python is allowed to read modules from and write modules to. The second command will install all the various Python modules necessary for the API to the current directory, and the last command will build those modules.
When you’re done, you’ll have a directory structure that looks like this:
1$ ls # From obj_detection
2bin include models my_project protobuf.zip readme.txt
3
4$ cd my_project
5
6$ ls
7bin build dist lib object_detection object_detection.egg-info setup.py slim
Finally, the following command will test your setup: if you get an OK at the end, you’re good to go.
1# From my_project
2
3$ python3 object_detection/builders/model_builder_test.py
Troubleshooting#
You might not get an OK at the end. Unfortunately, I can’t troubleshoot your setup for you, but I can tell you that when I was troubleshooting my own, the most finicky part I encountered was setting the PYTHONPATH correctly; we did this above with the line that began with export.
StackOverflow actually works pretty well to figure out what other things you should put in your PYTHONPATH I had an issue finding libcublas.so.9.0; for me, that meant running $ export PYTHONPATH=/usr/local/cuda-9.0/lib64/:$PYTHONPATH.
If you leave the project for a while and come back, you’ll have to run all the export lines again to restore your PYTHONPATH. I created a bash file that ran all the necessary export commands, and I would run $ source setup_python_path.sh whenever I logged on.
For completion’s sake, I also include the line export LD_LIBRARY_PATH=$LD_LIBRARY_PATH:/usr/local/cuda-9.0/targets/x86_64-linux/lib/ in my script; running the test script wouldn’t work without it. This is probably relevant only to my computer, but it might help you out too.
Step Two: Preparing the Datasets#
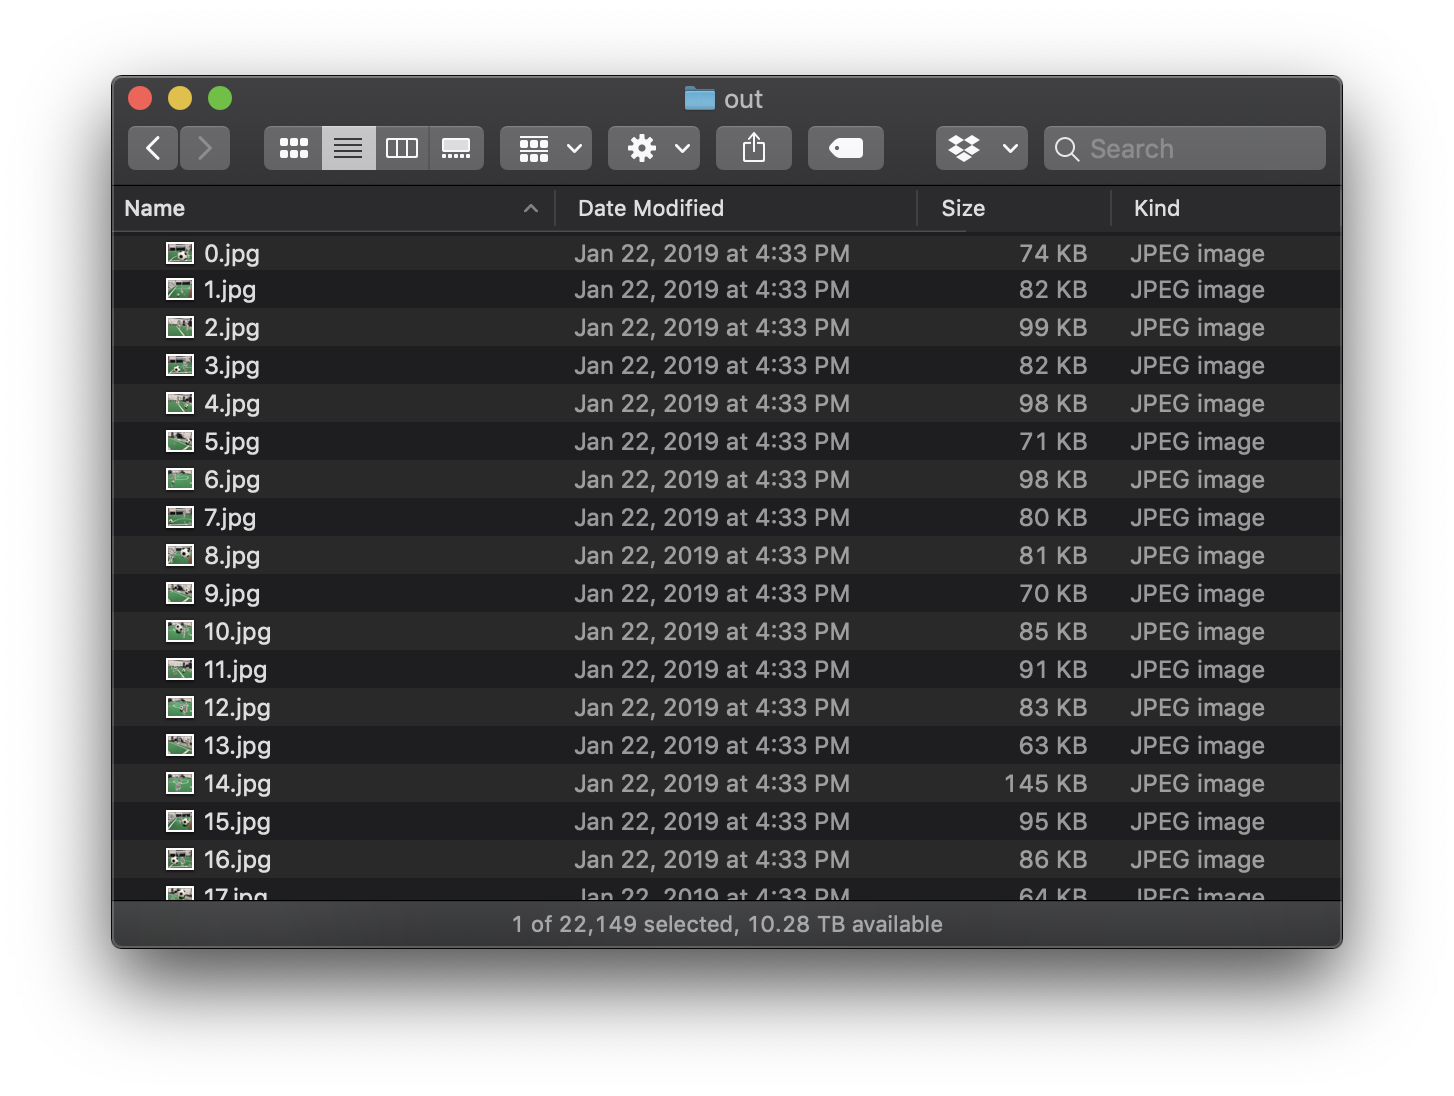
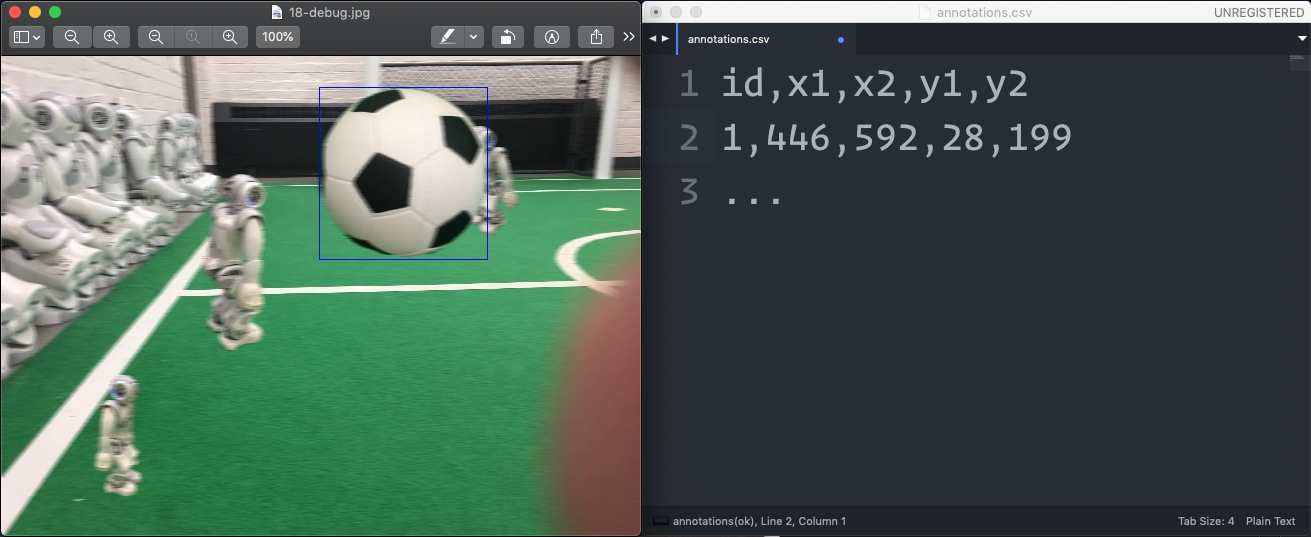
Since the API we’re using is based on object detection, you’ll need to have a dataset you want to work with. This dataset should be comprised of images and annotations in whatever format you choose: I had JPGs numbered 0.jpg through 9999.jpg and a CSV file with the coordinates of the objects I’m detecting.
For each object in an image, you should have x1, x2, y1 and y2 coordinates available, where (x1, y1) is the upper left corner of the rectangle and (x2, y2) is the lower right corner of the rectangle.
You’ll probably have two of these datasets, one large one for training and one smaller one for testing. We’ll be taking the two datasets and transforming each of them into .tfrecord files: large binary files that contain a complete representation of the entire dataset.
I wrote a Python script to do this. The script reads in each image in a directory, reads the corresponding line in a CSV file, and appends the TFRecord with the image data and the associated coordinate data. Your script will probably look different since this is based on my dataset and this will be based on yours.
Remember: If you’ve logged out of your shell since setting up your Python path, you’ll have to set it up again before running this script.
1import tensorflow as tf
2from object_detection.utils import dataset_util
3
4flags = tf.app.flags
5
6# Here is where the output filename of the TFRecord is determined. Change this,
7# perhaps to either `training.tfrecord` or `testing.tfrecord`.
8flags.DEFINE_string('output_path', 'output.tfrecord', 'Path to output TFRecord')
9FLAGS = flags.FLAGS
10
11
12def create_tfrecord(filename, coords):
13 # You can read these in from your image, or you can hack it and
14 # hardcode the dimensions in.
15 height = 480
16 width = 640
17
18 filename = str.encode(filename)
19
20 with open(filename, 'rb') as myfile:
21 encoded_image_data = myfile.read()
22
23 image_format = b'jpeg' # b'jpeg' or b'png'
24
25 xmins = [coords[0] / width]
26 xmaxs = [coords[1] / width]
27 ymins = [coords[2] / height]
28 ymaxs = [coords[3] / height]
29
30 # Here, you define the "classes" you're detecting. This setup assumes one
31 # class, named "Ball". Your setup will probably look different, so be sure
32 # to change these lines.
33 classes_text = [b'Ball']
34 classes = [1]
35
36 tfrecord = tf.train.Example(features=tf.train.Features(feature={
37 'image/height': dataset_util.int64_feature(height),
38 'image/width': dataset_util.int64_feature(width),
39 'image/filename': dataset_util.bytes_feature(filename),
40 'image/source_id': dataset_util.bytes_feature(filename),
41 'image/encoded': dataset_util.bytes_feature(encoded_image_data),
42 'image/format': dataset_util.bytes_feature(image_format),
43 'image/object/bbox/xmin': dataset_util.float_list_feature(xmins),
44 'image/object/bbox/xmax': dataset_util.float_list_feature(xmaxs),
45 'image/object/bbox/ymin': dataset_util.float_list_feature(ymins),
46 'image/object/bbox/ymax': dataset_util.float_list_feature(ymaxs),
47 'image/object/class/text': dataset_util.bytes_list_feature(classes_text),
48 'image/object/class/label': dataset_util.int64_list_feature(classes),
49 }))
50 return tfrecord
51
52
53def main(_):
54 writer = tf.python_io.TFRecordWriter(FLAGS.output_path)
55
56 with open("annotations.csv") as fp:
57 line = fp.readline()
58 while line:
59 data = line.split(",")
60 tfrecord = create_tfrecord("img/out/{}.jpg".format(data[0]), data[1:])
61 writer.write(tfrecord.SerializeToString())
62 line = fp.readline()
63 writer.close()
64
65 print("Done.")
66
67
68if __name__ == '__main__':
69 tf.app.run()
Make sure you know when your script is done running — a print() call should do just fine. When you have your two completed .tfrecord files (one for the training dataset and one for the testing dataset), put them somewhere and hold onto them for later.
Step 3: Training and Testing#
While this tutorial describes how to train the Object Detector API using your own data, it isn’t describing how to train a model from scratch. This distinction is important: instead of starting from nothing, we’ll be starting with an existing, generalized object detection model and continuing to train it based on our own data. Models, in Tensorflow’s world, can simultaneously be independent entities and checkpoints, meaning that after training a model for a long while, you can either pack up and call it a day and use that model in the wild, or you can stop for a bit and resume training later. We’re doing more of the second option, although instead of resuming the exact same training, we’re nudging an existing model (which I’ll call the baseline model) towards the object detection we want it to be able to perform. This lets us get some results fairly quickly — the existing models have been trained on very high powered computers for a very long time, and our tweaks take only a little bit of time.
The Object Detection API provides a set of these baseline models; they allow you to either use them out of the box or initialize new models based on them. I used “SSD with Inception v2 configuration for MSCOCO Dataset,” but you might want to use a different baseline model depending on what you’re trying to detect. To download the one I used, run the following command:
1$ wget http://download.tensorflow.org/models/object_detection/faster_rcnn_inception_resnet_v2_atrous_oid_14_10_2017.tar.gz
2
3$ tar -zxvf faster_rcnn_inception_resnet_v2_atrous_oid_14_10_2017.tar.gz
Training and testing happen at the same time — the scripts in the API run a testing step after every training step. To begin the training/testing, we’ll first need a configuration file; the configuration file framework you use depends on which baseline model you’re using. (If you’re not using a baseline model, you can either write your own or modify one of the given ones.)
The configuration I used is below, and originally comes from the Object Detection API’s sample configs. The file gets saved in your working directory as mymodel.config (although the actual filename doesn’t totally matter). I’ve marked within the file the lines you should modify, and kept the original comments as well.
1model {
2 ssd {
3 num_classes: 1 # Change this!
4 box_coder {
5 faster_rcnn_box_coder {
6 y_scale: 10.0
7 x_scale: 10.0
8 height_scale: 5.0
9 width_scale: 5.0
10 }
11 }
12 matcher {
13 argmax_matcher {
14 matched_threshold: 0.5
15 unmatched_threshold: 0.5
16 ignore_thresholds: false
17 negatives_lower_than_unmatched: true
18 force_match_for_each_row: true
19 }
20 }
21 similarity_calculator {
22 iou_similarity {
23 }
24 }
25 anchor_generator {
26 ssd_anchor_generator {
27 num_layers: 6
28 min_scale: 0.2
29 max_scale: 0.95
30 aspect_ratios: 1.0
31 aspect_ratios: 2.0
32 aspect_ratios: 0.5
33 aspect_ratios: 3.0
34 aspect_ratios: 0.3333
35 reduce_boxes_in_lowest_layer: true
36 }
37 }
38 image_resizer {
39 fixed_shape_resizer {
40 height: 300
41 width: 300
42 }
43 }
44 box_predictor {
45 convolutional_box_predictor {
46 min_depth: 0
47 max_depth: 0
48 num_layers_before_predictor: 0
49 use_dropout: false
50 dropout_keep_probability: 0.8
51 kernel_size: 3
52 box_code_size: 4
53 apply_sigmoid_to_scores: false
54 conv_hyperparams {
55 activation: RELU_6,
56 regularizer {
57 l2_regularizer {
58 weight: 0.00004
59 }
60 }
61 initializer {
62 truncated_normal_initializer {
63 stddev: 0.03
64 mean: 0.0
65 }
66 }
67 }
68 }
69 }
70 feature_extractor {
71 type: 'ssd_inception_v2'
72 min_depth: 16
73 depth_multiplier: 1.0
74 conv_hyperparams {
75 activation: RELU_6,
76 regularizer {
77 l2_regularizer {
78 weight: 0.00004
79 }
80 }
81 initializer {
82 truncated_normal_initializer {
83 stddev: 0.03
84 mean: 0.0
85 }
86 }
87 batch_norm {
88 train: true,
89 scale: true,
90 center: true,
91 decay: 0.9997,
92 epsilon: 0.001,
93 }
94 }
95 override_base_feature_extractor_hyperparams: true
96 }
97 loss {
98 classification_loss {
99 weighted_sigmoid {
100 }
101 }
102 localization_loss {
103 weighted_smooth_l1 {
104 }
105 }
106 hard_example_miner {
107 num_hard_examples: 3000
108 iou_threshold: 0.99
109 loss_type: CLASSIFICATION
110 max_negatives_per_positive: 3
111 min_negatives_per_image: 0
112 }
113 classification_weight: 1.0
114 localization_weight: 1.0
115 }
116 normalize_loss_by_num_matches: true
117 post_processing {
118 batch_non_max_suppression {
119 score_threshold: 1e-8
120 iou_threshold: 0.6
121 max_detections_per_class: 100
122 max_total_detections: 100
123 }
124 score_converter: SIGMOID
125 }
126 }
127}
128
129train_config: {
130 batch_size: 24
131 optimizer {
132 rms_prop_optimizer: {
133 learning_rate: {
134 exponential_decay_learning_rate {
135 initial_learning_rate: 0.004
136 decay_steps: 800720
137 decay_factor: 0.95
138 }
139 }
140 momentum_optimizer_value: 0.9
141 decay: 0.9
142 epsilon: 1.0
143 }
144 }
145 fine_tune_checkpoint: "YOUR-BASELINE-MODEL/model.ckpt" # Change this to point to your baseline model -- in the file you just downloaded
146 from_detection_checkpoint: true
147 # Note: The below line limits the training process to 200K steps, which we
148 # empirically found to be sufficient enough to train the pets dataset. This
149 # effectively bypasses the learning rate schedule (the learning rate will
150 # never decay). Remove the below line to train indefinitely.
151
152 num_steps: 400000
153 data_augmentation_options {
154 random_horizontal_flip {
155 }
156 }
157 data_augmentation_options {
158 ssd_random_crop {
159 }
160 }
161}
162
163train_input_reader: {
164 tf_record_input_reader {
165 input_path: "YOUR-TRAINING-TFRECORD/training.tfrecord"
166 }
167 label_map_path: "YOUR-LABELMAP/labelmap.txt"
168}
169
170eval_config: {
171 num_examples: 8000
172 # Note: The below line limits the evaluation process to 10 evaluations.
173 # Remove the below line to evaluate indefinitely.
174 max_evals: 10
175}
176
177eval_input_reader: {
178 tf_record_input_reader {
179 input_path: "YOUR-TESTING-TFRECORD/testing.tfrecord"
180 }
181 label_map_path: "SAME-LABELMAP-AS-ABOVE/labelmap.txt"
182 shuffle: false
183 num_readers: 1
184}
Finally, you’re ready to run the detector. Put the following into a file called run.sh:
1PIPELINE_CONFIG_PATH="YOUR-CONFIG.config"
2MODEL_DIR="./object_detection/modeldir"
3NUM_TRAIN_STEPS=50000 # Change this if necessary
4SAMPLE_1_OF_N_EVAL_EXAMPLES=1
5
6python3 object_detection/model_main.py \
7 --pipeline_config_path=${PIPELINE_CONFIG_PATH} \
8 --model_dir=${MODEL_DIR} \
9 --num_train_steps=${NUM_TRAIN_STEPS} \
10 --sample_1_of_n_eval_examples=$SAMPLE_1_OF_N_EVAL_EXAMPLES \
11 --alsologtostderr
And finally, you can run that script ($ ./run.sh) to get the training job started.
TensorBoard#
TensorBoard is a program that comes with Tensorflow that starts up a local web server and hosts a dashboard to show the progress of the training and testing job. You can set up Tensorboard to watch your model directory (./object_detection/modeldir) and it can describe the progress of your training job.
In a new terminal (so as to not disturb your training job), navigate back to your my_project directory, reconfigure your Python path, and then run:
1$ tensorboard --logdir=./object_detection/modeldir
With that running, you can navigate to http://localhost:6006 and watch the graphs go by over the next few hours or days
Conclusion#
I wrote this up because I couldn’t find a tutorial online that went through these same steps, so I hope this ends up being helpful for the next person who wants to embark on this same journey.
I’m also sure I got some things wrong; reach out if I have an error and I’ll work to correct it.
Other Resources#
I clearly looked up a lot of ways other people were doing this. Unfortunately, due to the nature of online research, it will be impossible for me to list everything I encountered on the internet that helped me along the way. However, here is an incomplete list of sources (and an implied list of apologies to those who I forgot):